Showing posts with label quilting blocks. Show all posts

Monday, January 24, 2022

What's in your Genes?

 Believe it or not!!...

Quilters DO have other hobbies!

There are other interests and sometimes they happily cross over.

Some quilters have other crafting interests such as hand or machine embroidery, scrapbooking, painting, and the list goes on...  Some are into gardening, photography...and I often find that whatever it is...it compliments their quilting interests.

This one I wasn't quite expecting. I dabble in family history...genealogy.  Haven't given it much attention in the past few years as I have come to the end of the trail where a few branches are concerned.  

Just browsing through YouTube the other day, a suggested video caught my eye.  It was about using Google Books for genealogy research.  It was a very interesting discussion.

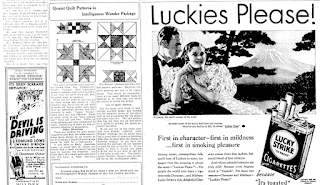
Looking through old newspapers, look what I found!  Suddenly I'm off on another rabbit chase...for old newspaper clippings with block patterns!

Edwardsville Intelligencer, March of 1933


If you are interested in genealogy as well and would like to watch Lisa's YouTube about how to use Google Books, here's the link:

https://youtu.be/-rgWwuJ5dG4

How did your other interests lead you back to quilting?


Have a great week!

KK

Friday, October 7, 2016

Block Two - Be My Neighbor


Are you having fun?  I have loved diving into my scraps, pulling out a bit of fabric and remembering when and where I used this fabric, friends I may have been with, or the lucky recipient of something made with love.  Brings warm and fuzzy feelings to be using the last bits.

Building Permits for Block Two went out early this morning. So let's get started.

Cut all your pieces according to pattern instructions.  And then piece together in sections.  There are two distinct buildings, so it is easier, I find, to build one at a time.


Two roofs which require those pesky Flying Geese.  The silo has a chimney - a neat little twist.


Have both my roof sections completed here.


And then there's all those HST's (Half Square Triangles).  They can be a bit tricky if your seam size strays North of a quarter-inch.

But there's a solution....


If you find that your HSTs aren't quite measuring up to size, cut your squares a little larger.  Draw the diagonal line and sew either side of line like normal.

Cut apart and press open.

Get out that square-up ruler.  Align the diagonal line on the ruler with the seam of the square as pictured.  Align with the measurements of square required and trim away excess.

Making your HSTs over-sized assures that you will have perfectly sized HSTs.
And that's it for this week.  Wasn't that fun?

Happy Sewing!
KK


P.S. Don't forget to SHARE your pics!


Monday, October 3, 2016

Five Weeks Til Christmas


Block One is out today.

This quilt was inspired by a pattern by Kate Spain called Solstice for Moda Fabrics.  I have adapted it for another Moda fabric line from Sandy Gervais called Very Merry.  I have added different borders and prepared instructions for multiple sizes.
You are welcome to use your own color / fabric adaptations.  If you wish to use our fabrics, Kits will be available at our website - KK's Quilt Studio.   


For Block One.  If you would like to make:

Bed Runner (34 x 106 inches) - Make one Block
Throw/Lap Size (70 x 70 inches) - Make one Block
Queen Size (88 x 106 inches) - Make six Blocks
King - (106 x 106 inches) - Make five Blocks

There are several Flying Geese in this block.  I HATE all those extra little triangles that usually get trimmed away.  Just a waste.  So I am all about the No Waste Method of making Flying Geese.  It may even make you love making Flying Geese.  I used to avoid them - passing on patterns that had them.

First cut one large square (geese) and four smaller squares (sky).  Measurements depend on finished size.  I have a handy chart I saved from somewhere - can't see to find where - but Dani Fisk - this is yours, Thank you.
Right Click on picture to save.

Moving along.  Draw a line corner to corner on all your smaller sky pieces.


Place two sky pieces on larger goose as shown below and sew a scant 1/4 inch away from line - both sides.


Cut apart on drawn line.  Press open.  Yes, they look like little kitties!


Place last two squares on these "kitties!"
Repeat sewing either side of line and cut apart.  Trim away all those little dog ear corners.

You are almost there.  Press open again and voila!  Four Flying Geese almost like magic before your eyes!  And virtually pain free!


That's all for today.

Happy Sewing!
KK

Thursday, September 29, 2016

SPIDERS....Oh My!

Every where I look, my yard is filled spiders and their webs.  They've been there all summer, but it seems as fall approached they kicked up the "decorating" to full gear!


Working on the Be My Neighbor Sew Along has been great.  Bags, baskets and drawers of little bits, strips, and fabric ends have been hiding in the corners of my Studio and under my cutting table reproducing - I'm almost positive!  Well it's time to clean the cobwebs!

It's been on my bucket list - a string quilt.  So the spiders have inspired me to get started on the spider web block.  This is a foundation piecing block.  And I'm always looking for another way to use a ruler.


I pulled out my Cozy Quilt Designs Strip Tube Ruler and the EZ Dresden Ruler.  (Both are available on my website if there are not already in your arsenal.)


The is a recycling, Use-It-Up project, so I dug into my computer paper recycling bin as well.  Use scrap paper for a foundation for the strip piecing.  With the Strip Tube Ruler as a template, I can get two triangles from an 8-1/2 x 11 inch sheet of paper.

Yes, a corner is missing, but there's enough to get the job done.  I do not want to put a seam any closer to the corner because of bulky seam issues.
 Using the center line of the ruler, make a small mark indicating the center of the long edge of the triangle (the hypotenuse for all you math geniuses!)


Draw a line from that mark to the corner.


Do the same for both triangles on the page.


Cut the sheet in half.  Make lots more.

You can use scrap computer paper, old catalog pages, or newsprint, even old phone books.


Just make them all the same size.

Make as many foundations as you have scraps, or as big a quilt as you want.

I always go BIG and have A LOT of scraps and this will be an ongoing project - so stay tuned.


Next use you EZ Dresden Ruler to cut the center "kite" pieces which will form a star. These pieces will all be white or off-white / cream pieces.  Cut 8 inch wedges.  If you have a large enough piece of fabric, cut an 8 inch strip and cut wedges as shown below, flipping the template as you go.  (Cut your pieces 8 inches, not six as in the picture.)


Let's go to the sewing machine.  Lower the stitch length.  Tighter stitches will make it easier to remove paper when completed.
Center a "kite" on the center line of paper foundation right side up.  Place first scrap strip face down.

Seam width is not as important, but try to stay 1/4 inch along aligned edges.

Stitch.

Flip strip.  Press.  Repeat.


Keep adding strips until paper foundation is covered and looks something like this..


I know, it looks like a HOT MESS!  It gets better!


 Flip the pieced triangle over, paper side up.  Using your cutting ruler and rotary cutter, trim away uneven fabric edges.

Then it's looking a lot more like what we are shooting for!  And we did't have to do any strange math calculations.  Hurrah!


Here's two together!  Now only about 80 more!


So stay tuned.  I'll be working and the pile grows.

If you are one of those overachievers.......remove paper carefully so as not to stretch those bias edges.  Sew triangles together forming quilt top.  Quilt as desired and POST pics!

Happy Sewing!
KK


Friday, September 23, 2016

Block 1 Be My Neighbor Sew Along


You should have received your instructions for Block 1 this morning.  If you haven't signed up yet, there's still time.  Just send me your email (look to the right) or message me through Facebook and let me know you want to join The Neighborhood.

Patterns include cutting measurements and sewing instructions.  Colors and patterns are up to you as everything is in grey scale.  Let's see how creative you are!  Post your blocks and progress with the hashtag #ModaBeMyNeighbor

We got organized yesterday, so you should be ready to select, cut and sew.

Pick fabrics that will work and are large enough for piecing / measurements required.  Cut fabrics and organize in groupings as shown in pattern instructions.


This is the base of the tree and I sewed this unit, pressed and set aside.


I worked on the tree top next.  Cut rectangles and squares, and stack together.


For the tree top and roof of house, you are essentially creating a series of flying geese.  You can draw a diagonal line as given in the instructions.  I prefer to  eyeball it for smaller pieces using the blue tape line as a guide and extension of my center needle mark on my needle plate of my machine.
There are several tools out there to duplicate this effort.  This is what I find effective.


Two words of caution:
1.  Use only blue painters' tape or some low-tack tape.  DO NOT use masking tape.  It's hard to remove and either leaves a residue or will take cabinet or sewing machine finish right up with it!
2.  Sew to the outside of your line - the side you will cut away - just a smidge.  DO NOT sew on the drawn line.  Ask me how I know!


 You will not get a corner that folds back like this!  It should perfectly match the edge of the rectangle.  If it doesn't, unsew and try again.  Don't try to stretch it or squish it.
That's what God made seam rippers for!
Set the seam and press.


Next trim away the excess fabric from behind.  (you can save for another project if large enough-crumb sewing-blog post for another day ;-)

Do one side at a time.  Sewing, pressing and trimming.


Assemble all parts in units.  Units sewn to units.  Pin where necessary to ensure points align.


I fussy cut the flower pot for my windows.  And had to piece some fabric of the house.  Hey!  It's scraps - right?


And voila!  Block 1 is finished.  Only 15 more to go!

Here's the Schedule
Block 2    October 7th
Block 3    October 21st
Block 4    November 4th
Block 5    November 18th
Block 6    December 2nd
Block 7    December 16th
Block 8    December 30th
Block 9    January 13th
Block 10  January 27th
Block 11  February 10th
Block 12  February 24th
Block 13  March 10th
Block 14  March 24th
Block 15  April 7th
Block 16 and Setting   April 21st

Now what did you put in the Crock Pot for dinner?

Thursday, September 22, 2016

Breaking Ground on Be My Neighbor Sew Along


Starting a new project is always fun for a quilter.  This one checks two things off my bucket list - using up scraps and a "house" quilt.

So let's get organized and set up for a sixteen block quilt.

The quilt patterns come in grey scale, so there is no correct color and I do not expect that any two will look alike.  I'll be posting pics of my progress and I encourage you to share your progress, too.

Share with the #ModaBeMyNeighbor tag on Facebook, Twitter, Google+ and Instagram.

Ok - I sound like a broken record, but let's start with your machine!
When was the last time you popped the needleplate and cleaned the bobbin area?  (Check the Blog Archive for a recent post for machine cleaning.)

And new project - let's change that needle.  I like a size 75/11 or 80/12 Sharp.

Thread.  I prefer a 50 wt for piecing.  Lets go ahead and pre-wind several bobbins.  Choose a thread color complimentary of your fabrics.  I usually select a cream or grey/greenish leaning thread.  It tends to blend into any fabric.

Cutting mats, rotary cutters (change that blade - leaning harder means it's time for a new blade), scissors, and cutting rulers.  Don't forget the seam ripper!


And then there is that fabric....

I chose to use my extensive collection of scraps!


There are lots of blog and opinions out there about what to keep, how to keep it, and how to use it!  Well, I keep anything an inch and over, keep it in a basket, or sorted by color in drawers.  And I am about to use it!  No pre-cutting and more sorting.

So I am picking as I go - colors, prints,  just making it fun!

And you can see..it may need a press...so set up the iron and ironing board.  I have a small pressing board which reverses to a cutting mat and cordless iron right next to my machine.  Reduces steps and keeps me working.

 So put the Crock Pot on...and let's sew!   Look for Block 1 tomorrow!

Here's the Schedule
Blocks 1-16 can now be found on the Sew Along Page of my website